Showing posts with label Acrylic Paint. Show all posts

4 January 2023

The Male Room Challenge #170 - Galaxy and / or Stars

Good morning everyone, 

As this will likely be my first post of 2023 let me wish you a Happy New Year! 

This month at The Male Room we are looking for Galaxy and / or Stars.

For my card I started off with some smooshing in various colours of Distress Oxide Ink on black card. 

Once I had the effect I was after I splattered the piece with white acrylic paint to create stars. To make the gold and sliver elements I painted black card with Gansai Tambi Starry Colours metallic watercolours before stamping and / or die cutting with My Favourite Things Space Explorer stamp and die set. Finally I stamped the sentiment in gold ink. 

Will you be inspired by the Galaxy or Stars theme, or both? Join in the fun over at The Male Room challenge #170.

Much love

Steph x


7 June 2022

Uniko June 2022 Release Introducing - Layering Stencil Zesty

Hi and welcome, 

Here we have the introduction of a marvellous set of stencils called Uniko Layering Stencils Zesty and I have had a ball with these! 


With my fondness for green I chose to create lime slices but of course there are other fruits you could use these stencils for. There are four stencils in all with this set but I have only used three of them here. Come back for the reveal and release day and you will see all four in action!

Firstly I inked the circles and semi circles stencil in green chalk ink. Next I added the ‘segment’ detail by dabbing white acrylic paint through the second stencil. Finally I added the ‘juicy’ squirts by inking a third stencil from the set.

Now. get yourself over to the Uniko blog and see more zesty creations from the rest of the Brand Ambassadors! Don’t forget to leave everyone a very lovely comment, it really does mean the world to us.


Much love
Steph x


30 December 2021

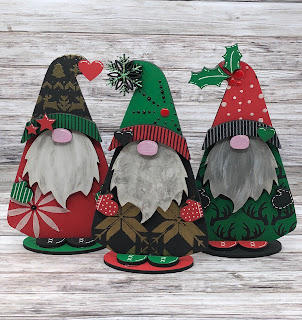
Funky Fossil Gnomes Part II

Morning all, 

I didn’t think I’d have time to post Part II of my Funky Fossil Gnomes this week but if I don’t do it now I won’t get round to it for ages and then the Christmas spirit may have passed!


As with the last trio, I have used acrylic paints and a mixture of stencils, texture paste and Nuvo drops.

I will be entering into the following challenges:

Crafty Hazelnuts Christmas Challenge #574

The Holly and the Ivy Christmas challenge #106

Happy New Year to you all wherever you are and whatever you will be doing…I’ll be in bed! 😂

Much love

Steph x


12 December 2021

Funky Fossil Gnomes - Part I


Good morning all, 

A while ago I purchased two packs of Funky Fossil’s trio of gnomes (so 6 in total!) and I had the best time decorating them. 

This set was given as a late November birthday present so the recipient would be able to use them for Christmas this year. 

I have used acrylic paint for the base colours and beards. The decorative elements are a combination of heat embossing, texture paste or painting through a stencil. I’ve added detail with some Nuvo drops, stickles and a white gel pen.

The second set are being given as a gift for Christmas so I will share those at a later date!

I haven’t had time to enter any challenges for ages so here goes:

Happy Little Stampers Dec Stencil Challenge 


Happy Little Stampers Dec Christmas Challenge 

Much love 
Steph x

23 July 2021

Uniko Introducing... Stencils Flower Power #8, Rainbow & Clouds, Squared & Tropical Leaf I

Hi everyone,

Go grab yourself a cup of tea because we have a fabulous FOUR Uniko stencils being introduced today!

Firstly we have Flower Power #8 which matches the Uniko Flower Power #8 stamp set.  

I must have Christmas in my mind currently because when I saw this stencil I thought of a poinsettia. I wanted the flower to have some texture so I used white texture paste through the stencil and used the spatula to create 'veins' in the leaves. Once dry I was able to colour the paste with a mixture of inks and watercolour pens. The green watercolour pens have added sparkle which is so beautiful so I added some Wink of Stella to the red areas too. The paper I added the texture paste to also has a pearlescent touch so this is a very shimmery card! I fussy cut around the edge of the paste as I wanted to capture the shape of the flower. Finally I added the sentiment from the Uniko Stunning Snowflakes stamp set. 

Next we have the Rainbow & Clouds stencil. 


I like playing around with stencils and I seem to be less rigid in my crafting style when I use a stencil. This card is a good example of that and I have used lots of techniques here although the camera doesn't pick up in them all too well. My first job was to simply colour the rainbows through the stencil. I also used metallic white watercolour paint to colour the clouds. I knew I wanted to give the panel a blue watercolour wash so before I removed the stencil I inked it up with Versamark and used clear embossing powder to seal the rainbows and clouds. I gave the panel a light wash with watered down acrylic paint and was able to remove the paint from the embossed areas easily. Once it had dried, I placed the stencil back over the panel and ran it through the die cutting machine with an embossing mat which gave some subtle definition to the piece. Finally I added the sentiments, stamped in red, from the Uniko Simply Said Blocks stamp set.

Half way through now guys, how is that cup of tea?

The next stencil is called Squared. Now if you joined my for the sneak peeks on Monday you will see that I mentioned that some of the release might not have been my immediate 'go to' but I actually completely fell in love with the product once I got my hands on it. This is that item!

Initially I was having a panic about how to use this stencil but then I had a sudden blast from the past a realised that it was very like some wallpaper my brother had on his wall in the 80's! I can't remember the exact pattern but I remember the colours and the geometrics so I recreated it in this card.


And I love it!! It was so simple to create but the effect is amazing and it's perfect for those 'oh so difficult' masculine cards. I started off with a piece of grey card and drew inside each of the squares with a red gel pen. I then moved the stencil a little up and to the left and did exactly the same but with a black pen. I started off with my black gel pen but it decided to seize up on me within seconds so this is a simple black biro! I moved the stencil again, this time down and to the right, and used a white gel pen to draw the squares. I cut the panel to size and layered onto a red then black piece of card, each slightly larger than the last. I heat embossed the sentiment from the Uniko Anniversaire Arts Decoratifs stamp set and mixed 80's style with 20's elegance! Finally I added some Glossy Accents drops randomly to the panel. 

Now for the last stencil which is called Tropical Leaf I.


Just like the sentiment on my card, this stencil is lovely. I have used the inner part of the stencil only here but you do get the centre 'cut out' part too. Unusually for me this is a 5 x 7 card as I needed the bigger size to make the most of my tropical leaf border. I have inked the leaf up in pink and green before using Versamark and gold embossing powder for the solid gold leaves. For added interest I then used a Versamark pen to draw around the inside edge of the stencil and heat embossed this to give a 'skeleton' leaf effect. I added the gold glitter card frame with foam pads and inside this a panel using a sentiment from the Uniko Hello Lovely stamp set. 


So, how was that for lots of loveliness? And lucky you, because there's even more gorgeous inspiration over on the Uniko blog as the Brand Ambassadors have outdone themselves! Go check it out and come back tomorrow for the final Uniko Introduction before the big reveal, release day and blog hop GIVEAWAY on Sunday! 

Much love
Steph x


9 July 2021

Color My Heart Color Dare Challenge #452

Hi everyone,

Color My Heart Color Dare Challenge #452 is now live and I know I say this all the time, but it’s super!! 😂

Make sure you use ALL three colours. Black, white and silver can also be used but are NOT part of the three colours. 

Initially I was a little stumped for inspiration as I wouldn’t normally put these three primary colours together, well not without a bit of lovely green anyway! But this is what I love about Color Dare, it makes me even more creative and I’m always surprised by what I achieve.


I decided to be bold and use a block of each colour. Notice how they are in the same order as the challenge graphic? OCD at work! I knew I wanted to use my beach hut stamp so I heat embossed in Wow! Opaque Bright white powder. The three huts are actually attached to each other on the stamp so I had to do a bit of masking and gentle brushing away of embossing powder to achieve the separated huts. I have splattered acrylic paint in the corresponding colours onto the card base before attaching the beach hut panels with foam pads. Finally I added the heat embossed sentiment strip to the right hand side. 

I loved the effect of this card so I created a second one along the same lines. 


I was a bit more generous with the paint splatters on this one!

I hope you feel inspired to join the challenge and you should definitely head over to the blog to see all the other wonderful creations from the Design Team.


Much love
Steph x